14th Annual Southern Vintage Kart Classic

14th Annual Southern Vintage Kart Classic

By Dick Charest
Photos by Alan Lidke

The 14th Annual Southern Vintage Kart Classic was held at Roebling Road Raceway on October 17-18, 2020. The track is located near Bloomingdale, GA. It is 2.02 miles long with nine turns. The facility features a 60-acre paddock with paved access roads.

Each year in March the Southern Kart Club (SKC) hosts the 2nd race of the World Karting Association National Road Racing Series. However, in October the SKC holds a club race at Roebling Road with special emphasis on vintage karts. The vintage karts run four exhibition races over the 2-day weekend. There are two, 15-minute vintage exhibition races on Saturday and two more 15-minute vintage exhibition races on Sunday. Both vintage lay-down enduro karts and vintage sprint karts are welcome to participate.

The weather was beautiful on both Saturday and Sunday. It was sunny and cool in the morning but warmed up nicely as the day progressed. The turnout was more than expected and registration on Saturday morning extended throughout the 1st practice session. To help those who missed the 1st practice session, a short 3rd practice session was run before the races started.

I missed the 1st practice session and during the 2nd practice session my engine did not run well, the clutch under slipped, and I could not get the CHT up to the desired range even though I leaned out the carb HS needle. By the 2nd lap the spark plug was getting badly fouled so I came into the pits. After practice I installed a new spark plug and turned in each of the clutch adjusters to increase clutch slip. During the short 3rd practice session, the engine ran better but I still had an ignition problem and the clutch still under-slipped. I figured that the clutch under-slipping prevented the engine from getting into its power band and the bogging at low RPMs caused the spark plug to foul. After practice I turned in each of the clutch adjusters again to increase clutch slip and installed a new spark plug for race #1.

Tony Severino brought his “old skool” 100cc Mac-powered Hegar to Roebling and ran very well.
On the grid – Terry Armstong’s Quicksilver powered by a 135cc Dap T62 reed sits besides the number 7x7 sit-up sprinter.

Vintage Exhibition Race #1 on Saturday

Tony Ellison’s kart (#13) next to Harry Foskey’s kart (#18) on the starting grid

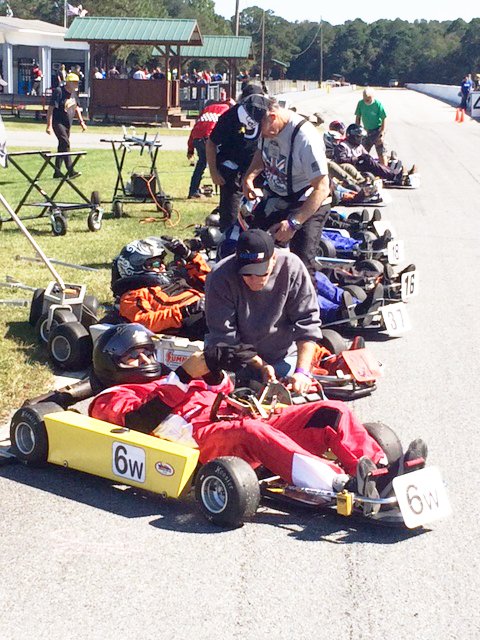
When the green flag dropped, Tony Ellison got a good start and took the lead of the race. I was gridded last of the 11 karts that were in the vintage race. I got a good start and started passing karts. The engine ran well but still at low temperature. The clutch worked better but by the 3rd lap the ignition problem returned. I ran another lap, but the ignition problem got worse, so I came into the pits rather than getting stranded out on the track. Tony Ellison set fast time for the Vintage 1 race and won the race with his K-35 completing 10 laps. Arthur McKenny was 2nd with his Yamaha, Chris Foskey finished 3rd with his Yamaha, and Terry Armstrong finished 4th with his DAP T-62. Arthur, Chris, and Terry all completed 9 laps. All 11 karts that started completed at least one lap. Five entries in the Vintage race did not make the grid.

Since my ignition problem occurred only after the engine electrical system got warm even with a new spark plug, I suspected that the coil had gone bad. After the race I installed a good spare coil and test ran the engine in the pits. It started up easily and ran well so I tried it again in Vintage race #2.

Vintage Exhibition Race #2 on Saturday

As in race #1, when the green flag dropped, Tony Ellison got a good start and took the lead of the race. I was gridded 9th of the 10 karts that started the race, but I got a good start and started passing karts. Although the engine ran well, the clutch under-slipped and that hurt my lap times in the curves on the backside of the track. I had a difficult time getting the engine up into its power band. However, I drove on and completed the race. Tony Ellison set fast time for Vintage 2 race and won the race with his K-35 completing 10 laps.

Arthur McKenny’s kart (#6w) at the head of the starting grid
Bill Anderson’s piston port powered Van K finished 3rd in Sunday’s Heat 4. All types of vintage karts, laydowns and sit-up sprinters are welcome to compete. Just change the gear and get ready for a high-speed ride!

Arthur McKenny was 2nd with his Yamaha, Chris Foskey finished 3rd with his Yamaha, and I finished 4th. Arthur, Chris, Scott Orr and I all completed nine laps. Bill Anderson, Bennett Armstrong, and Harry Foskey all completed eight laps. They were followed by Terry Armstrong and Trevor Armstrong. Six entries in the Vintage race did not make the grid.

After the race I changed engine and adjusted the clutch for Sunday’s Vintage 3 race.

I ran a short practice on Sunday morning to verify everything was OK with the engine. Although the engine ran well, the clutch over slipped badly so I came into the pits after one lap. I backed out the clutch adjusters to the setting I came to the track with. Since there was no more practice, I tested the clutch engagement in the pits, and it seemed to be OK for the race.

Vintage Exhibition Race #3 on Sunday

Tony Severino on track with his McCulloch powered Hegar kart (#62)

I got a great start and passed everyone before entering turn one to take the lead of the race. Chris Foskey, Terry Armstrong, and Tony Ellison were fairly close behind. Tony dropped out on lap one due to a stripped drive belt. Terry Armstrong and Bill Anderson dropped out on lap three. Chris was quicker than me on the back side of the track because my clutch under slipped which slowed me down on that portion of the track. However, I consistently pulled away from him on the straight. He drafted me to stay in contact, but he could not overtake me. The engine ran well, and I maintained the lead of the race to the end. I set fast time for Vintage 3 and won the race by only 3.119 seconds. Chris Foskey finished 2nd, Bennett Armstrong finished 3rd, Scott Orr finished 4th followed by Alan Lidke, Harry Foskey, Tony Severino, and Trevor Armstrong. Three vintage karts did not make it to the starting grid for race 3.

After the race I adjusted the clutch to get more slip and prepared the kart for Vintage race #4.

Vintage Exhibition Race #4 on Sunday

As in Vintage race 3, I got a great start and took the lead before getting into turn 1. After one lap I got a high CHT warning light so I richened the carb HS needle. However, the high CHT warning light persisted so I richened the carb HS needle again. Then I noticed that the CHT was reading 485°F then 520°F while the engine continued to run well. I realized that the CHT reading was erroneous, so I returned the carb HS needle setting to about where it was originally and continued throughout the race with the high CHT warning light on. Tony Ellison and Chris Foskey were close but on lap three, Tony Ellison dropped out. His engine mount had come loose, and the engine tipped over in a turn. Terry Armstrong had engine problems early in the race and dropped out. While lapping a couple of back markers I got enough of a lead on Chris Foskey that he was not able to draft me. I pulled away from the field and won the race by 1 minute and 21.673 seconds over Scott Orr. Bill Anderson (173) finished 3rd followed by Chris Foskey and Harry Foskey. I set fast time for the Vintage 4 race.

This event wrapped-up the vintage enduro season for 2020. The next road racing event with a vintage class is the WKA event at Daytona International Speedway between Christmas and New Years. That will be the first event of the 2021 racing season.

Dick Charest’s Invader looks pretty inviting. He ran both K99 and K299 B-bombs and after struggling the first couple of days, came through with a victory in Sunday’s Heat 4.
Arthur McKenny’s Yamaha-powered entry made a great showing buoyed up by Van Gilder of Elite Karting (shown getting ready to start Arthur).
How To Set Pop-Off Pressure

How To Set Pop-Off Pressure

By Len Emanuelson

First, let me start by stating that I’m no 2-stroke carburetor expert. However, I’ve been forced to learn certain things about how to setup and service my carbs as part of my race prep. One of those procedures is checking and setting pop-off pressure — the pressure required to unseat the inlet needle and seat, or in some cases, the carburetor’s gross jet. What this affects is the carburetor’s calibration (rich or lean) especially in the lower rpm ranges. There are as many target pop-off pressure settings as there are opinions and engine combinations, but the generally accepted settings are 8.5-10.5psi for gas and 5-7.5psi for methanol. You can’t go wrong picking a mid-point in those ranges as a starting point.

After you remove the pumper stack, what you see is the “brain” of the carburetor, the fulcrum arm/inlet seat assembly. It’s hard to believe, but this crude little lever spring arrangement operates at engine rpm, or in my case 15,000.

There are a couple of other factors that affect low-rpm mixture control. The most important is the fulcrum lever height. A good starting point is with the top of the arm adjusted (bent) so that it is flush with the adjacent “flats” on the carburetor. If you bend the arm up, you richen the mixture. Typical settings for raised fulcrum arms (at least on my carbs), is .030” for methanol carbs and .060” for my gas carbs. Another consideration is the type of inlet valve, needle and seat or gross jet. My Buller methanol carbs run dual-ball gross jets that flow more fuel (even at smaller openings) than needles and seats. My gas carbs use needles and seats that run cleaner on the bottom end and seem to give snappier response.

The way you check pop-off pressure on a typical Mikuni or Tillotson pumper carburetor is to remove the pump “stack” breaking the carb down to the carb body with it’s inlet valve, fulcrum arm and spring. Next, you pour some type of liquid in the inlet valve well. Kermit Buller recommends and sets his carbs up with Marvel Mystery oil, but gas, solvent, WD40 or most lubricants will work. Then you take your pop-off gauge and insert it in the passage that leads to the chamber below the inlet valve (see photo), and slowly pump pressure into this chamber. Keep watching the fluid around the inlet valve for bubbles if the gauge doesn’t seem to be holding pressure as you pump it up. Dirt or a bad gasket or surface under the inlet valve often leads to leaking here (you will see bubbles around the inlet valve).

Most inlet valves, needle and seats or gross jets require a liquid to provide a seal. I use Marvel Mystery Oil because it’s what Buller recommends for checking gross jets, but lighter oils like WD40 or your actual premix fuel work well too.

When you get to the set pop-off pressure the inlet valve will open releasing pressure (usually spraying oil all over). If you are using a needle and seat, it should be an audible “pop”, initial pressure release and then the gauge stabilizing at a “holding” pressure. If you are using a gross jet, the pressure will simply release at the pop-off number and then stabilize at a lower number. As Buller’s info sheets describe it, the gross jet acts more like a fuel regulator.

To change pop-off pressure you need to adjust that very tiny coil spring under the fulcrum arm. It’s good to have a large supply of pop-off springs as they have a nasty habit of launching, never to be found. For a given spring wire diameter etc., the length determines the pop-off pressure. I purchase my springs from Comet Kart Sales, but they are available from others such as E.C. Birt. As they come from Comet they are approximately .750”-long and produce a needle and seat pressure of 9.5psi in a Mikuni carb. That is nearly ideal for many gas foreign motors. By compressing the spring (squeezing it several times to coil bind between my fingers) to .570”, the result was 6.5psi in my gross jet methanol carb. It’s strictly a time-consuming trial and error operation. However, after you establish the correct length spring for your application, you can usually hit the pop-off number in just a couple of tries.

Get a good pressure check gauge. If you run 2-strokes, you’ll need it often. I found this one on the internet for about $35.
To check the pop-off pressure, slowly pump up the gauge until the inlet valve releases the pressure. This carb popped-off at around 6psi and held at 3.5psi, which was perfect for methanol fuel.

The photos here (iPhone7 camera) show me checking the pop-off pressure on an eBay carburetor I purchased (atomized methanol Mikuni) and also setting the pop-off pressure on an existing Buller atomized Mikuni I have been racing with that was too lean causing engine damage. It’s not a bad idea to check your carburetor’s pop-off pressure whenever you are installing a fresh diaphragm kit.

If the pop-off wasn’t correct, you remove the fulcrum lever and axle by simply loosing the Philips-head screw seen here to the right of the gross jet ball. Just loosen so that the fulcrum axle tilts up and slips out. If you remove the screw every time you need to grow a third hand to put it all back together.
The stamped steel fulcrum lever is pretty fragile, so if you need to bend it to adjust fulcrum lever height (described further on), be gentle. The bottom side has a dome that helps retain the spring. Make sure the fulcrum lever rotates freely on the axle.
Spring length determines pop-off pressure. The longer the spring, the higher the pop-off. Once you determine your correct pop-off spring length through trial and error, use that as your baseline.
If you noticed leaking around your inlet valve during pop-off testing, or the inlet valve just wouldn’t build to a pop-off pressure, there’s a good chance it is leaking under its seat. As you can see the debris in my second carb here that was allowing the gross jet assemble to leak by it completely. I cleaned it with a small screwdriver and added a fiber washer.
There is a love-hate relationship with both gross jets and conventional needles and seats.  I’m an equal opportunity hater – I use gross jets for methanol and needles and seats on my gas carbs. The gross jet on the left is from Buller, the needle and seat in the center is from E.C. Birt and the need and seat on the right is from Speed Parts.
There is a love-hate relationship with both gross jets and conventional needles and seats. I’m an equal opportunity hater – I use gross jets for methanol and needles and seats on my gas carbs. The gross jet on the left is from Buller, the needle and seat in the center is from E.C. Birt and the need and seat on the right is from Speed Parts.
Fulcrum lever height plays a role in determining a carburetor’s inherent richness or leaness. Level with the surrounding “flats” is kind of the neutral position. This lever is actually raised .040” above the carb body for a richer mixture.
The best way to check fulcrum lever height is with the depth end of a caliper. My methanol atomizers are .030”-.040” higher, and my gas Mikunis are setup with the levers .060” higher.
Here are some brutalized fulcrum arms in my collection. The one on the bottom with the sharp kink came off a carb with a gross jet. It is a good example of how to “dog-leg” a lever so that when you raise it, it is still parallel with the top of the carb. Likewise for the top lever.